Here's another tutorial for my primitive bunnies that can be put in all kinds of arrangements. I'm sharing the instructions for making the bunnies, use your own imagination for different ways to arrange them in all different kinds of containers.
Here we go....

First, I used muslin and folded it in half so when I cut the bunny out, it is double thickness. I free handed drawing a bunny outline directly on the muslin.

I cut out the bunny about a quarter inch on the outside of the pencil marks. Stitch along the pencil mark but leave an opening in the bottom to stuff him.

Turn him inside out, and place a piece of craft wire doubled over (like the piece shown) up in each ear. I then stitch a line at the base of the ear to keep the stuffing from going up into the ears.

Now stuff the bunnies and stitch across the bottom to close him up.

I cut a triangle of fabric and stitch it to his face for a nose. Use any decorative stitch you want here. Then I coffee stain them, I just dip them in a full pot of coffee, but use any formula you like.

Then I took Hemp thread and pulled through to make wiskers, you can use rusty wire curled on each end if you would like to instead. Use buttons, stars, paint or whatever you like for eyes. I used grungy berry bowl filler that I hot glued on.

For the tags, I cut a piece of brown paper bag from the grocery store, and just used a Word program on my computer to print "Bunny" and Rabbit" for their tags. You can use your imagination here for the tags.

I cut the tags out, punch a hole through them, wrinkle them a little and then thread a loop through each one. I just used cheese cloth around their necks looped through the tags, but you can use any fabric you like to here.
Now you're finished...how easy was that?

This bunny I placed in an old wooden bucket with some spanish moss for filler in the bottom and some spring berries in the back.

This one I arranged in an old, rusty wire basket.

Here, I arranged one in an old metal cup.

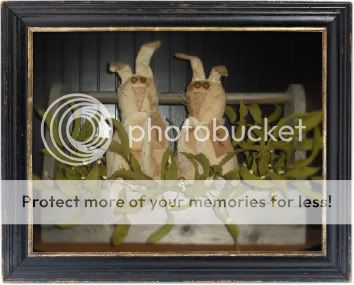
Here's my favorite, two bunnies arranged in an old tool box.
I hope you enjoyed and can use my bunny tutorial. I would love to see how yours come out!

**Christina**
No comments:
Post a Comment